how to install a door
how to install a door frame
door hinge adjustment
adjust refrigerator door
adjusting cabinet doors
how to install a door frame
how to replace exterior door
adjusting garage doors
how to adjust door closer
how to adjust patio doors
adjusting upvc doors
adjusting french doors
adjustable door stops
hydraulic door closer adjustment
how to adjust pocket doors
adjusting cupboard doors
adjust door alignment
how to adjust storm door closer
door strike plate adjustment
adjusting anderson doors
adjust french doors
adjust garage door opener chain
adjust cupboard door hinges
how to adjust door closers
adjusting door closer
door closer adjustment instructions
adjustable door threshold
how to adjust shower door
how to install hinges
antique hinge
|
Instruction of adjust doors
Adjustment of interior doors

|
Before adjustment of a door it should be remembered that repairs, as it is known, is a difficult and time-consuming process, what is more it requires a special succession of operations to be fulfilled. Time to adjust interior doors should be chosen depending on at what stage repairs are. If so called "European-style remodeling' with lots of alterations is done, then there is an opportunity to prepare an ideal doorway and make entire surface ideally "smooth". If that is case then interior doors can be adjusted when repairs are finished, because in that case there are more chances that doors will not be damaged. But most of repairs are done without leveling of walls and floors, that is why doors are adjusted right after sanitary and electrical works, but before field painting and tile paving. If this order is followed then there is a possibility to fix or hide some defects of walls, which might appear after doors are adjusted; it also makes it possible to use stopper or plaster to hide brows of door frames.
|
Encastre of door furniture
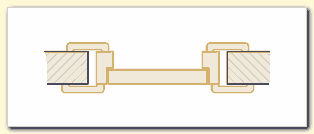
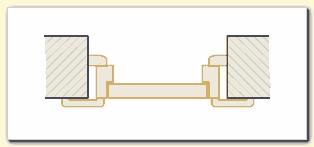
Hinges, front key plate (it covers place at edge of door where lock mechanism is encastred) and its stroke plate must be encastred into door leaf and door case "flushed with", in other words apace with surface. There are some possible exceptions for upper hinge, as depth of its encastre depends on back-lash and its size. What is more, all mentioned furniture must "fit" tight into prepared holes for it without any gaps (at very outside, gaps must not be more than 0,5-1 mm).
The results of this will show how professionally interior doors were installed. If there are no any gaps, for example, between hinge and door-case, then everything was performed professionally. By way this result can be achieved not only with help of a special electrical instrument called milling cutter, but also with usual paring chisel, hammer and a very thin and sharp knife or lancet. First of all hinges are temporary fixed with screws to edge of door-case, about 20 cm from upper and lower selvage of door. distance can be a little more or less, but it must be same in all doors.
The hinge is encircled with a lancet; veneering and wood fibers are cut to depth of 2-3 mm. After that hinges are unscrewed and round counter a hole of necessary size is made. In that way we get a hole which repeats all details of encastred detail. hinge must fit hole perfectly well, without any gaps. At very outside, there can be gap of 0,3-0,5 mm from one side of edge. But there are some disadvantages in this method - a sharp knife or lancet cut wood well only lengthwise fiber. If it has to be done crosscut they can cut only a thin lair of scale wood, as a result they make a deep scratch on veneered surface. To go on with work edge of paring chisel is put into scratch and with short hacks on handle a hole of 2-3 mm is made. This method of encastre can be very useful if it is applied to veneered doors and doors from solid wood. But it is not suitable for door-cases and doors made from medium density fiberboard, painted according to automobile technology, because this method allows cutting only a thin liar of paint. What is more, because of hacks on paring chisel paint on nearby surface starts peeling off that is why it is not possible to get a clear and even border. It is better to encastre furniture into door of same construction with help of already mentioned "milling cutter". A number of problems can appear while circuiting details, which have edges with rounded parts: smaller radius of rounded parts more difficult it is to perform operation with necessary level of accuracy. Therefore, for manual encastre it is better to use furniture with parts with lineal edges, and for mechanical encastre it is better to use furniture with parts with rounded edges.
Let's have a look at next phase. After details for hinges at edge of doorway are chosen, and hinges are fixed into holes with screws, each of hinges is covered with left part, and after that stand of door-case is fixed. placement of hinges is marked on stand, and whole circle of work is repeated once again, though now all work is done for stand. Pay attention to fact that first of all measurements should be taken from stand itself and not from whole door-case. That is why some doors manufactured in our country, and which are sold with a pieced together door-case, should better be taken to pieces: if it is maximum comfortable to carry out work then it will guaranty high quality of result. After hinges are encastred door panel is turned over, then lock is encastred and handles are fitted in. To make it more convenient and also to lower risk of breaking door panel during work, strike plate is encastred after doors are adjusted. It is done in following way: lock catch is covered with any coloring but easily washable substance, for example with PVA glue, which is always available while repairs are done. At first by turning handle lock catch is put away, door is closed and handle is dropped. At that moment lock catch gets out and leaves a mark on door-case. mark makes it easier to cut a hole for lock catch in door-case. After that strike plate is fixed to door-case, then it is lined (with a knife or lancet) by edge. After that same succession of operations is done, same as it was used for hinges.
|
Adjustment of interior doors
it is possible to talk about high quality of door-case adjustment only if one important rule is observed: if leaf of interior door stays immovable in any position. And that means that door-case must be adjusted strictly vertically in two mutual perpendicular angles. maximum possible deviation from vertical line must not be more than 1-1,5 cm. otherwise assembling defect will be seen visually. If doors are adjusted in a flat with uneven walls, then a lot of time is spent not only on encastre of furniture and fixing of door-case, but also on choosing most appropriate placement of door-case in doorway. What is more, it is absolutely necessary to take into account batter of floor, uneven surface and many other factors. In particular, some doors made in our country, which are manufactured with help of a simplified technology have their leaf and door-case far from being rectangular. What is more, they can change their geometrical features during exploitation. Very often after that door-case moves and door itself suddenly stops closing. More or less mentioned problems can be solved by constructors, who at present mainly use two methods of adjustment: with help of construction foam and method when door-case is adjusted with help of open timbering with screws. These methods have their own advantages and disadvantages.
Doors of "economy class" category (- $ * 80-100), most doors of Russian, Finnish and Spanish production are of this category, should be adjusted with help of second method and that would be most optimal variant.
Open timbering of a door-case. idea of this method is following: door-case is assembled around hanging door plate, open timbering makes it possible to adjust door-case in door-way with pinpoint accuracy and make some of its drawbacks less noticeable.
|
Assembly of door-case during adjustment
a part of door-case with encastred hinges (stand) and 3-4 through holes with diameter of 5-6 mm is fixed to wall with one or two screws. With help of some bars door stand is fixed vertically. After that door plate is hung on door leaf. Putting measuring level to edge of door and checking its position all time will make it easier to fix door leaf vertically and firmly with screws and stands.
Due to fact that in most cases walls lean a little, some small retreats are possible when door is adjusted but only until door leaf stays immovable.
The maximum possible leaning is calculated experimentally and essentially with oiled hinges. Otherwise there can appear a situation when noticeable dragging of dry hinges will cause door leaf staying immovable, after oil is put dragging is put out and door starts closing inadvertently.
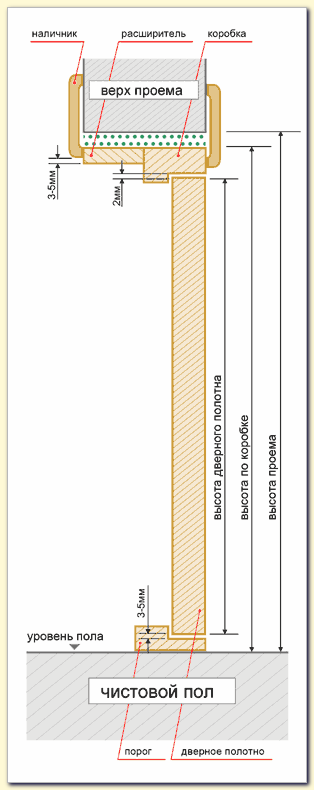
Having made sure that stand is in right place, it is taken away. rest holes in wall are made where marks are and after that door stand is put again and with help of screws it is fixed for good. After that it is checked how door closes and opens. If all mentioned requirements are met then second door stand is fixed at same level with first. It is fixed with screws in such a way that door leaf fits closely to door-case, without any gaps, and there should be a similar backlash of about 3-4 mm between edge of leaf and door-case. After that upper part of door-case is fixed (crossbar) with same backlash between it and upper edge of door.
As a result "back-lashes" in hinges and even form of door leaf are taken into account. In other words if necessary with help of bars stand can be curved in such a way that it would repeat form of door leaf. Besides mentioned requirements there some important moments which should paid special attention to.
For example, very often there is a question about distance between edge of door leaf and surface of door-case. Somehow many think that smaller backlash better and that is why people ask a craftsman to make minimal.
And every time we have to explain why we make backlashes while adjusting door a little bigger.
The method of using open timbering has several disadvantages, and mail one is that there appear gaps (8-10 mm in diameter) under screws (usually, after repairs are done they are covered with some stopper matching door-case in color or they are closed with some cap screws).
Also a few problems can arise during assembly of doors, as door-case is delivered already assembled with stands cut to 45* and a crossbar (the same is done with some Spanish doors).
Very often crossbar is a little short. To get at least minimal backlash between edge of door leaf and door-case (2-3 mm) a gap of 1-2 mm is left in one of upper corners of door-case; later it can be hidden with some stopper and will be almost unnoticeable.
|
Adjustment of doors with a "draft door-case"
The main part of problems, which appear when doors are adjusted, is result of low quality of building and because of that - it is result of poor state of building constructions. For instance, doorways very often have any form but not square, their splays and wall do not form a straight angle. Because of that a lot of time is spent on checking whether each stand is placed vertically. task can be noticeably simplified by using "draft door-case"- that is a frame from a big wide board which is inbuilt into doorway. If it is fixed strictly vertically then process of adjustment of whole door-case becomes a lot easier. Screw heads, which fix door, can be hidden under hinge, though after that it will be more difficult to regulate door because each time you will have to take off door leaf and hinges themselves. But if "draft door-case" is adjusted correctly then it will probably not be needed to regulate it at all, or at least it will come to minimum. Three or four screws for each stand can be enough to fix door-case. If door is hung on three hinges then there an opportunity to "hide" a screw under each of them. One of hinges is 'hidden" in opposite stand in its middle part - under strike plate of lock.
There is no space where to "hide" remaining two important screws. If door-case is wide enough (4-5 cm) then it is possible to "catch" edge with four screws put obliquely and fix it to door board of draft door-case. Later screw heads and hole itself are covered with a plat band. Why can't it be done in concrete or brick without a "draft door-case"? Because it is extremely difficult to drill a hole under necessary angle in these materials, and sometimes it is even impossible.
There is another variant when door-case is fixed in door way with help of metallic angles or bases. In this case there are very limited possibilities for regulation, because stands must be fixed from first try or at least from second try. This method of fixing is more time-consuming, because double work has to be done: at first to adjust and fix "draft door-case", what is more with high degree of accuracy, and only after that door-case itself is assembled. This method is often used when doors are adjusted into wide doorways, which make it possible to place there not only door-case itself but also two boards no less than 2cm wide.
It would be sensible to use this method while doing capital repairs, when old walls are knocked down and new ones are erected: knowing beforehand which doors will be adjusted makes it possible to put "draft door-cases" with necessary size of doorway during building.
|
Sealing of joints while adjusting interior doors
As a rule joints are filled with construction foam today. This operation takes only a few minutes, and after construction foam "dries up" (or in other words vulcanizes) extra parts of it are cut with a knife. method of open timbering when joints are covered with construction foam has one important advantage: if for some reason a year later door does not close then by taking off plat band and cutting bars and dried foam and with help of same screws it is possible to force apart stands a little. Though it is convenient to use this material, it is important to remember about some negative moments. It is proved in practice that in some cases when surface of foam dries up foam still remains a possibility to widen, what is more it can widen during a long period of time.
Very often it can lead to deformation of door-case. reasons for these unpleasant results can be very different: too much foam in hole, not enough humidity for foam vulcanization, and sometimes use of materials of bad quality. High level of humidity in air is very bad for dried foam which has open bug holes, that is why if it is used in sanitary conveniences then measures should be taken for vapor sealing of joints. And finally foam is not able to stop deformation of gnarled door-cases. most correct technique of sealing joints is using mortar of cement. It creates something like a base stand between wall and door-case, and it prevents door-case from deformation really good. But when joint is filled with mortar of cement which has a lot of water, door-case might move.
These consequences can excluded if from inner side of door-case a wide cello tape is put. By way it is not necessary to fill all empty places; it will be enough if joint are filled for about 1-1,5 cm. While performing this operation you will definitely make door dirty, but if surface is painted or vanished then marks can be washed off easily. Half-finished door which is not covered with paint or vanish is usually protected with a special "paint cello tape", glue used in this cello tape if exploited for a short period of time does not leave marks after it is taken off. material of sealing can crash because of some physical influence, for instance adjustment of plat bands; to avoid it some PVA glue should be added into matrix - 1-2 liters for 10 kg of dry mix; surface of wall cleaned from old layer of paint and stopper should be padded with glue.
The ideal variant of door adjustment is when joint is reinforced with lath. But if joints are 1-2 cm wide it will be enough to cover them with stopper and glue it with calico strip. Only after walls are completely repaired (wallpaper or paint) plat bands are assembled (they are hammered or glued).
When interior doors are adjusted joints must not be filled with alabaster, which is often used by many builders. Alabaster swells out when it dries up and mo9ves stands of door-case.
|
Adjustment of doors in toilets and bathrooms
There is a number of peculiarities when door are adjusted and assembled in a lavatory. Modern panel house building is done in such a way that standard lavatories are already put in all flats. Though they are made at a plat, their walls can have a lean from vertical line of about 5-7 cm. What is more, surface of same wall in plaster lavatories can have flections in different places. Taking into consideration fact that doors in lavatories are usually closed, disadvantage that they close by themselves could put aside; and doors could be adjusted in same line with wall, that means with same angle which has wall. But kitchen door or door to another room will be next to lavatory door, and it will be adjusted at a straight angle. If it is adjusted according to all rules and assembled vertically, it will draw attention to fact that door to lavatory is not at a straight angle and that wall is not straight too. That means that walls must be made straight, and it will lead too extra expenses ((- $ * 5-10/m2), surface will become smaller and it is needed in bathroom (somehow walls always lean inside room).
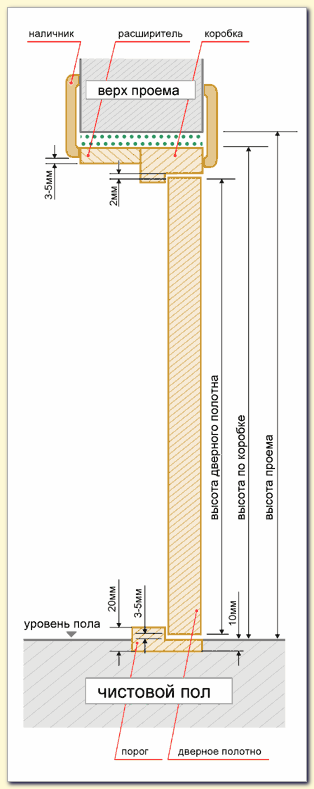
Lavatories have not only their own walls but also their own floor with a small step (about 5cm), which prevents flat from submergence. That is why lower edge of doors in a lavatory is about 10cm higher than in other doors in flat. It is well known most people try to order doors for flat of same kind.
Very often people buy standard two meters high doors for lavatory, though for a standard lavatory a door which is 190 cm high is needed. That is why it happens very often when door or doorway gas to be adjusted to door0case. Let's take a closer look at this situation.
|
Adjustment of a door-case
the walls of such a lavatory are quite thin (4-5 cm), that is why while choosing door it is necessary to choose door-case of needed width. It is ideal when door-case is no more than 1-1,5 cm wider than wall (taking into account width of tile and layer of matrix). In case of urgency, not to make whole wall even extra centimeters are cut off from door-case.
For instance this is needed when Finnish doors are assembled. It is very difficult to paint place where wood is cut and have same quality, is why cut side is usually covered with a plat band. Nevertheless line of cut is still noticeable. Similar operations when door-case is adjusted while door is assembled are possible if it is made of wood. If veneered door-case is cut then flitch can detach straight away or some time later. Door-cases made of MDF will become rotten if extra centimeters are cut from it.
Widening of doorway during assembly of door
If question has to be answered, what to do, - widen doorway or cut door, it has to be taken into account that not every door can be cut and every doorway can widened. At first it has to be decided whether you want upper line of all doors in flat to be at same level. In most cases it is a very important factor, though some clients do not care at all about doors placed at different levels. This part of clients does not want to risk their doors being spoilt, and as a rule they insist on doorway being widened. If walls of lavatory are made of plaster then it is not difficult to perform (- $ *5-10).
First of all it is possible to used an angle grinder, though there will be a lot of dust. What is more plaster can be easily cut with a hand saw with big teeth, but some effort has to be put to cut metal reinforcements inside wall. If a SANDVIK blade is put into hand saw, then work will take only a few minutes. Some lavatories made of asbestos cement sheets have a metal part above upper part of doorway - it is a part of grating. If it is cut then whole construction will be affected. wall will not fall of cause but there can appear holes where it is affected and especially where tile is. That is why it is recommended to cut door and not widen doorway in such lavatories.
It is possible to shorten only those door leaves which have distance between lower edge and lower fielded panel bigger than distance between upper edge and upper fielded panel. Then when lower part is cut (- $ *5-20) distances between fielded panels will become almost same. Interior doors from solid wood can be shortened; same can be done with simple framed and braced doors without any fillers or with them. If it is done then lower connecting bar is taken out (in framed and braced doors) and after work is done it is put back.
|
If it is necessary to adjust a door with a narrow doorway
There are many multistoried buildings where doors in lavatories are only 55 cm wide. Such doors can be found on market, but their choice is very limited. That is why very often standard doors (60 cm) have to be adjusted to such a narrow doorway. doors in such lavatories are divided only with a wide board (about 20 cm). A standard switch box with a socket is situated on it. difficulty is that board is element of door-case of each door. If it is taken out, we can not fix stand of new door-case. Both stands can be connected, but it will be almost impossible to fix it to a centimeter wide sheet of asbestos-cement. It is impossible to leave this board or at least part of it because then we'll have to widen doorway from other side of door, and it is impossible to do because of size of bath: its edge will come out of doorway.
In that case following scheme can be used for adjustment of door. doorway is completely cleaned; dividing board is also taken out. Stands with hinges are fixed to walls. Both doors are hung and adjusted at same level. After that stands (from both door-cases) are connected with same crossbar. distance between leaves is measured taking into account backlashes and a bar is made of same size. During assembly it is put between stands and is fixed to upper part of crossbar and to lower corner of old door-case. After that are fixed to bar. That means that same construction is created and it will be similar to previous one; but switch box is put in nearest wall.
|
Summery of conclusions about adjustment of interior doors
Though it is possible to have quite good results when we adjust to standard doorway almost every door even if door of not very good quality is assembled, most rational process is following.
1. When door is bought we should take into account not only appearance but also its construction and technology of production. Defects can be in any product, no matter what make it is.
The quality of imported doors is very often unsatisfactory because they are transported and kept not in correct way. If we speak about door produced in our country it has to be said that though there are some good results in door production during last five years, there are still many examples when simple technologies are used for door production. That is why when you buy doors produced in Russia, you have to be more attentive. For example, when you buy a pine door you have to find out from what kind of pine leaf and door-case are made. If door-case is made from whole crossbeam then you have to make sure that there are not many knots. It is possible that when season changes, and that means that air humidity changes, door can be deformed.
2. If lavatory does not have visible defects and it is not changed, then it is better to choose doors for whole flat, same doors produced at a factory (the door-case about 190 cm high and 6-6,5 cm wide). At beginning of 90ies when choice of doors was very limited it was a norm to shorten door or door-case during assembly. Even now some firms which sell Spanish doors offer client to cut part of leaf at client's expense. But if lower connecting bar is cut away whole construction of doors is influenced. Sellers usually assure that nothing bad will happen. But it is better not to make such experiments and trust producer; by way modern choice of doors for typical lavatories is quite wide.
3. If it happens to be very expansive to get rid of production or building defect then it is better to knock down old lavatory and install a new one. This variant is even better when it is needed to install new pipes with a separate tap and heated towel rail. Otherwise four walls of lavatory would be cut and pipes would put in holes in them. If it is done then in plaster walls metallic net is cut and in asbestos-cement walls sheet, which creates inner wall, is cut; and it will definitely weaken whole construction. advantages of new lavatory are obvious. new walls will be vertical, that means that plaster is not need for them and there is no need to make them even, width of walls will be same as width of door-case. Standard two meter door can adjusted in new lavatories, and to avoid flooding floor lever can be made lower than in other rooms.
The amount of work seems to be very big, but in reality it is not very expensive to perform all these repairs.
|
|